Wedding album design made easy
Designing a wedding album is not a difficult task if you are using the appropiate tools, allways remember that the software should not compromise your creativity in any way. We believe that the best tool for a photograher is Photoshop and therefore you should use it also for your albums, in conjuction with Album DS you have a powerfull but fast and easy to use tool.
In this short tutorial I’m going to explain you how to create a wedding album sheet easily from scratch.
First of all we have to create an empty sheet, please make sure you have input the correct album size while creating the album, this can be checked at the Album – Edit option in the main menu.
For the sample I’ll work with a 60x25cm sheet
Now select Sheet – New sheet, you will get a blank empty sheet with 2 pages ( left and right) and guides for the margins input in the album size window. At Photoshop layers palette you will find the background layer and one Color Fill layer ( in white but easily changeable by double clicking at the color thumbnail in the layers palette).
 Next step will be to create the shape layers for the pictures, they are different methods to get shape layers but the easiest is using Photoshop’s rectangle tool.
Please note the settings needed to create a shape layer with the rectangle tool.
 You may also use the rectangle with rounded corners, elipse or custom shape tool to create it, just experiment.
Draw a rectangle in the sheet, if you don’t like the inital color you may change it by double clicking the first thumbnail at left in the shape layer at Photoshop’s layers palette.
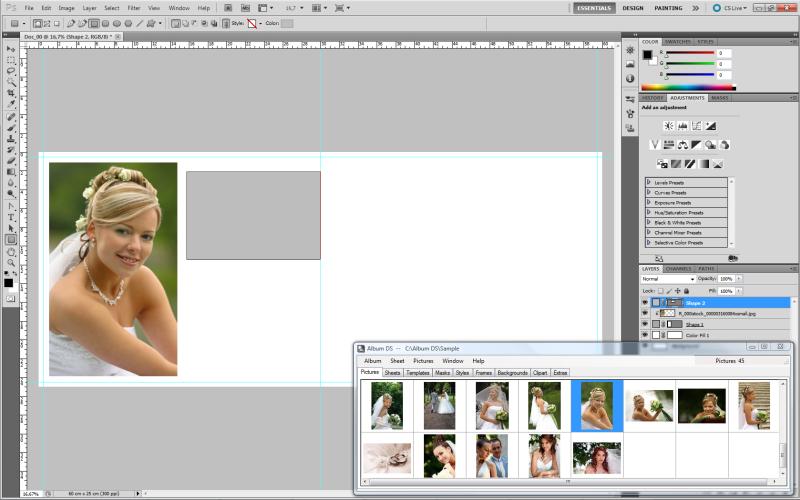
 Select the shape layer and double click at a picture in Album DS, this will place the picture in the document resizing it to fit the shape layer. Depending on your preference settings in Album DS the picture will be centered or placed at the top left corner of the shape layer.
 You may use Photoshop’s move tool to reposition and / or resize the picture, just make sure to have selected “Show transform controls” for the Move tool options and drag from a pictures corner to resize it ( keep Shift pressed to keep aspect relation).
 Create another shape layer with the rectangle tool, this time I will create an horizontal shape layer.
 And now duplicate the layer to place 2 horizontal pictures, this can be done with Photoshop’s layer menu ( right click on the layer in the palette), by pressing ALT and dragging the layer between 2 layers in the palette, pressing ALT and dragging the layer in the document, or just using the Layers menu in Photoshop.
 We have to align this layers now, and Photoshop has perfect align tools for this matter. Please select both layers in the layers palette and then select the Move tool. Look at the align options in this picture.
 Align the shape layers and move them to be aligned also to the top of the other layer, then resize them slightly to fill until the bottom of the other layer.
 It’s time to place a couple of pictures, select the target shape layer in the layers palette and double click at the picture in Album DS.

Let’s place a background now in our wedding sheet. Select the background tab in Album DS, then select a background and double click at it.
 The background will always be placed over the Color Fill layer and the background to show the original background color and design, you may easily drag the Color Fill layer one layer above and change the blend mode to Color ( or whatever mode you prefer) and then also change his color, the layer will now blend the background and make it look completely different and tailored for your pictures.

We still need a picture on the right side, please drag a new rectangular shape layer filling the page from top to bottom and at the right border but don’t fill the page at left.
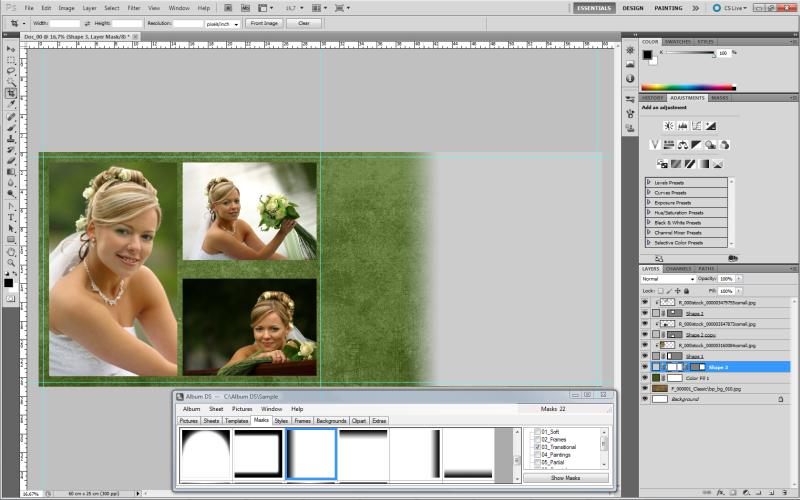
 Select the Masks panel in Album DS and then the Transitional folder, click at Show masks to see all transitional masks. Select the one which is black at left with a gradient and double click at it.
 This will create a smooth transition between the background and the picture, let’s place now the picture.

Depending on your own style a wedding album may have different looks and complements, you may easily place them using Album DS’s features; I’ll show you some of them.
Clipart: select the cliparts tab in Album DS and double click at a clipart thumbnail like I did here with the Decor_vectorial ones. Once placed in the sheet you may use Photoshop’s Move tool to resize and reposition it.
 Styles: can be added to a picture, for sample to frame it with a stroke or a shadow. Please select the shape layer of the first picture at left and then the styles tab in Album DS, double click at the style thumbnail in Album DS to apply it to the shape.
 Applying the style to the shape layer instead of the picture has a great advantage because the picture remains untouched and you may also save the sheet as template for future use.
But styles can also be applied to a clipart, please select the first layer which is the decorative clipart and then select in Album DS one of the Layer style folders in the Styles tab, double click at the style thumbnail to apply this style to the decorative clipart. Remember that you may easily modify the style by changing any of the effects in Photoshop’s layers palette, click at the small fx you can see at bottom of the palette to change them.

A wedding album template sometimes also includes a short text, no problem … you are using Photoshop and may write any text and use all Photoshop features to change the text apearence like font, rotations, bold, cursive, following a path, styles, etc.
As a sample I have just copied the style applied to the clipart in this sheet to the text at top making them look similar, this is easily done with the copy / paste layer style feature available by right clicking at the layers palette.
Wedding album design can be as complicated as you want, or just simple, it’s your style and you get it properly done with Photoshop and Album DS.
Calendars for Album DS
Album DS can use calendars in PDF format stored in the Cliparts folders, this PDF files are automatically placed in the sheet when you double click such a clipart. PDF calendars may be resized and easily adapted to your calendar format. But the text in the PDF can not be changed, therefore it’s important to have a way to customize the calendar at maximum.
Calendar creator for Open Office
This is an easy calendar creator fully customizable for Open Office, you may change the complete appearance of the calendar and then use it for Album DS.
You may download it from the original site:
http://extensions.services.openoffice.org/en/project/Calendartemplate
or a slightly modified version for Album DS from:
https://www.albumds.com/support/Calendar_creator_for_open_office.ods
Instructions:
– Once downloaded open the file with Open Office.
– Adjust cells B16, and B17 for the current year and month. Input them as numeric values
– input which day the week starts in B18. This should be a text value and MUST be one of the availables at C26 to C32.
You may check the result of this changes in the calendar as soon as they have been entered, or recalculate pressing F9
Now input all holiday dates for your location in the fields B26 to B44, if you need more dates you may insert some rows between. Please write the dates in the appropiate format for your location, for sample “dd/mm/yy”. You may check your own country holiday dates at http://www.timeanddate.com/calendar/?year=2011&country=1
Finally you have to change the value in fields B16 for the next months and print the result for each month in PDF format. You may do this by selecting the cells to print and then print to PDF. If you don’t have a PDF printer driver you may download a free one from http://www.pdf995.com/
Once all calendars are ready in PDF format just create a small thumbnail for each of the PDF files, for sample:
If the calendar file is January2011.pdf then you have to create a 100×100 pixels JPG file named Januar2011.jpg and put it in the same folder as the PDF file. The content of the JPG may be just a text like “January 2011” over a white background.
The PDF files and the related JPG files have to be saved into a subfolder of Album DS’s Cliparts, for sample in Cliparts\Calendars2011 to make them visible for Album DS.
To place a calendar in a sheet using Album DS please double click the calendar in the cliparts tab, then you may resize it at your convenience. I kindly suggest you to change the blend mode to Darken for a better result as it will leave the white part transparent.
If you are looking for an Excel template please search on:
http://www.spreadsheetguys.com/downloads/templates/calendar
http://www.vertex42.com/ExcelTemplates/yearly-calendar.html
http://www.dotxls.com/excel-calendar-templates
Excel templates are very similar to the Open Office one explained here, just remember that you need to print the result in PDF format and create a thumbnail to use the calendar in Album DS.
Abstract shape forms
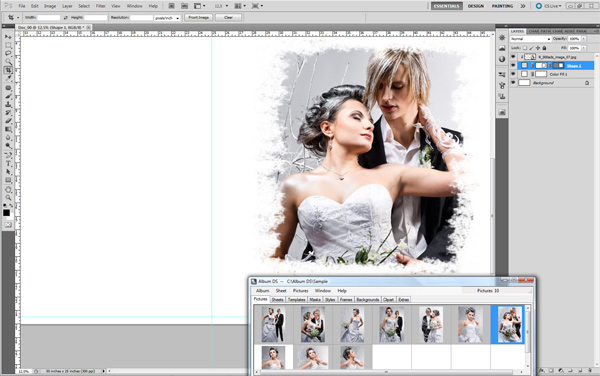
Album DS inserts pictures into Photoshop®’s Shape layers, this way the picture inherits the form, size and location of this shape layer and you may easily get non conventional shaped pictures without having to make intrincate selections or cut-outs.
For sample, lets take a document in Photoshop® which already has a round corner shape layer with a grouped picture:
now we will add a new shape layer by means of Photoshop®’s rectangle tool, at this tool options we have to select custom shape tool and then in shapes we select bubble text
we draw this bubble text shape layer at the right upper corner of the picture taking care that the new layer is above the picture
the new shape layer is ready to receive the image, just double click the picture in Album DS to add it
Remember that you may find new shape layers available in the net, at our website you will find some links for this shapes but you may also create your owns using the Photoshop® Selection tool and then clicking at Album DS Extras – Convert selection to shape button.
Creating a mask file for Album DS
In this tutorial I’m going to show you how to create your own masks, it’s a very easy and fast process.
First we need to create an empty document in Photoshop®, I suggest a 2000 x 2000 pixels document but it can be of any size considering that a larger document will have more definition. Sometimes higher definition is not the best option for a mask because we usually look for feathering the borders, therefore the suggested size is probably the best working, it’s important to create a square document because we don’t know a priori if the picture is in horizontal or in vertical format and a square one will fit all; you may also create masks only for vertical / horizontal pictures .
Now you have to understand that a mask is made of white areas and black areas ( of any opacity), black areas will hidden the picture and white areas will show it.
Therefore the next step will be selecting a brush to paint the dark areas, you may use any brush at any size, even brushes downloaded from the net. In this case I will select a wet brush from Photoshop®’s predefined brushes
Select black as foreground color in Photoshop® tools and just start painting one of the sides of the document, moving the brush will paint it all black; depending on the selected brush may be the best result is to click and release each time.
Once the side has been painted do the same with the top or bottom side
IMPORTANT: Check that the most out border is completely painted in black, take in mind that the mask will be applied to a shape layer inheriting his size, in case you have light areas at the border you may get strokes there.
Now you have 2 options: painting the other 2 sides or just create a copy of the layer and rotate it 180º
Change the blending mode to Multiply and flatten the layers to get only one layer with all 4 sides painted.
You only have to save the document using Album DS integrated feature at Sheet – Save as mask, you may save the document in a new folder if desired
And the new mask will appear in the masks tab of Album DS, like the originally provided ones:
We may use the new mask by double clicking at it after having selected a shape layer in Photoshop®
Remember: working with Photoshop® and Album DS doesn’t limit your creativity and you may easily create your own templates, masks, backgrounds, etc.
Template with proportional and aligned shapes
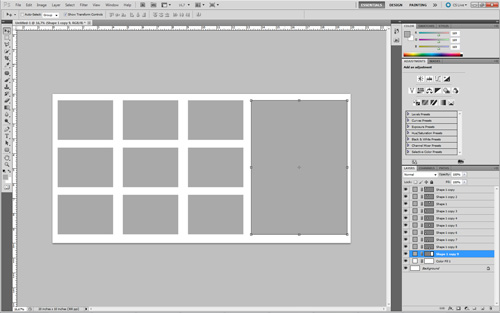
Let’s create a sheet / template for Album DS using proportionally sized shape layers and later align them. Please follow this steps:
1.- Create an empty sheet of the desired size in Photoshop®, you may use Album DS New sheet for this.
2.- Draw a shape layer in this sheet, to do this please select the Rectangle tool in Photoshop® with the settings shown in this picture. The settings panel is available below of the Photoshop® menu, if you can’t see it please select Window – Options in Photoshop®. Remember that the rectangle too also allows for drawing rounded corner shapes, ellipses or even custom shapes.
3.- Now that you have a shape you need to resize it, let’s say you want a 5×7 proportional shape. Please select the move tool in Photoshop® and activate “Show transform controls” in the options.
Click at any of the shown corners in the shape and the options of the Move tool will appear in Photoshop®.
Input your desired proportion in the fields 3 and 4, you have to write the units like 7in or 10cm. Don’t worry if the shape is too large or too small for now, the only important thing is the proportion.
4.- Press Shift and while keeping this key pressed resize the shape layer with Photoshop®’s Move tool by dragging on one of the corners. You should have a perfectly proportioned shape layer in the whished size now, but you only have one …
5.- Copy this shape layer. You may dragg it in the layers palette to the “Create new layer” icon or simply press Alt and drag it to between 2 other layers. This will create copies of your original shape layer.
6.- But all layers are one over the other now, just take the Move tool ( remember to activate “Show transform controls”) and move them. You may Auto select the layers but I recommend to select them in the layers palette for a better control.
7.- Align the layers using the Move tool options: Select 2 or more layers in the layers palette ( click at the first, then press Shift and click at the other layers), once the layers are selected you may use Photoshop®’s Move tool options to align them. This option are at the right of the options panel:
 – Align top edges
- – Align vertical centers
- – Align bottom edges
- – Align left edges
- – Align horizontal centers
- – Align right edges
- – Distribute top edges
- – Distribute vertical centers
- – Distribute bottom edges
- – Distribute left edges
- – Distribute horizontal centers
- – Distribute right edges
8.- Using this tools your shape layers will be perfectly distributed and aligned.
9.- Of course you may resize your shape layers again and reposition if needed. Please select the multiple layers you want to resize / move and use the Move tool as before ( remember to press Shift while resizing to keep proportions).
10.- Creating more layers is very easy, select the ones you want to copy ( multiple layers) and copy them by dragging to the New layer icon or pressing Alt and draggin between 2 layers in the layers palette. Select Move tool and position the new layers in the sheet.
11.- Remember that Photoshop® will allways help you automatically to position the layers, you will notice a slight stop in the move process when a layer is aligned with another.
12.- You may also rotate one your proportional layers in 7×5 to create a 5×7 one using the Move tool, resize it and align with the rest.
13.- Very important: Don’t rename the first part of the shape layers name, the first 5 letters should be “Shape” ( or the apropiate translation in your Photoshop®’s language like “Forma” for Spanish) always or Album DS will not work correctly.
Don’t be overwhelmed with the instructions, actually it’s very easy and once you have the first sheet you will not believe how easy it is to create your templates, your style, your creativity.


